
카테고리 없음
11일차 과제 4
신승호.
2023. 2. 12. 03:24
- 주어진 데이터를 활용하여 제시되는 결과를 만드는 코드를 작성하시오
var mathData = [26, 2, 9, 47, 98, 24, 43, 99, 96, 45, 35,
			19, 37, 60, 31, 74, 26, 4, 28, 19, 59, 14, 75, 13,
			93, 88, 64, 15, 68, 34, 96, 48, 1, 44, 14, 11, 31,
			39, 28, 100, 22, 73, 78, 98, 36, 49, 74, 16, 35, 91,
			14, 73, 93, 49, 3, 99, 4, 29, 86, 56, 17, 13, 97, 55,
			94, 7, 100, 66, 59, 85, 94, 11, 16, 48, 16, 44, 75, 14,
			17, 88, 92, 12, 49, 35, 42, 82, 19, 27, 11, 21, 34, 27,
			47, 40, 66, 90, 99, 93, 63, 90];
4-1) 모든 요소를 Colors.amber 색상을 적용하여 출력하시오.
import 'package:flutter/material.dart';
void main() {
runApp(const MyApp());
}
class MyApp extends StatelessWidget {
const MyApp({super.key});
@override
Widget build(BuildContext context) {
var mathData = [26, 2, 9, 47, 98, 24, 43, 99, 96, 45, 35,
19, 37, 60, 31, 74, 26, 4, 28, 19, 59, 14, 75, 13,
93, 88, 64, 15, 68, 34, 96, 48, 1, 44, 14, 11, 31,
39, 28, 100, 22, 73, 78, 98, 36, 49, 74, 16, 35, 91,
14, 73, 93, 49, 3, 99, 4, 29, 86, 56, 17, 13, 97, 55,
94, 7, 100, 66, 59, 85, 94, 11, 16, 48, 16, 44, 75, 14,
17, 88, 92, 12, 49, 35, 42, 82, 19, 27, 11, 21, 34, 27,
47, 40, 66, 90, 99, 93, 63, 90];
return MaterialApp(
home: Scaffold(
body: SafeArea(
child: GridView.builder(
gridDelegate: SliverGridDelegateWithFixedCrossAxisCount(
crossAxisCount: 4, mainAxisSpacing: 8, crossAxisSpacing: 8),
itemCount: mathData.length,
itemBuilder: ((context, index) {
return Card(
shape: RoundedRectangleBorder(
borderRadius: BorderRadius.circular(16)),
color: Colors.amber,
child: Center(
child: Text(mathData[index].toString()),
),
);
}),
),
),
),
);
}
}

4-2) 10이 넘지 않는 수만 다음과 같이 출력하시오.
import 'package:flutter/material.dart';
void main() {
runApp(const MyApp());
}
class MyApp extends StatelessWidget {
const MyApp({super.key});
@override
Widget build(BuildContext context) {
var mathData = [26, 2, 9, 47, 98, 24, 43, 99, 96, 45, 35,
19, 37, 60, 31, 74, 26, 4, 28, 19, 59, 14, 75, 13,
93, 88, 64, 15, 68, 34, 96, 48, 1, 44, 14, 11, 31,
39, 28, 100, 22, 73, 78, 98, 36, 49, 74, 16, 35, 91,
14, 73, 93, 49, 3, 99, 4, 29, 86, 56, 17, 13, 97, 55,
94, 7, 100, 66, 59, 85, 94, 11, 16, 48, 16, 44, 75, 14,
17, 88, 92, 12, 49, 35, 42, 82, 19, 27, 11, 21, 34, 27,
47, 40, 66, 90, 99, 93, 63, 90];
19, 37, 60, 31, 74, 26, 4, 28, 19, 59, 14, 75, 13,
93, 88, 64, 15, 68, 34, 96, 48, 1, 44, 14, 11, 31,
39, 28, 100, 22, 73, 78, 98, 36, 49, 74, 16, 35, 91,
14, 73, 93, 49, 3, 99, 4, 29, 86, 56, 17, 13, 97, 55,
94, 7, 100, 66, 59, 85, 94, 11, 16, 48, 16, 44, 75, 14,
17, 88, 92, 12, 49, 35, 42, 82, 19, 27, 11, 21, 34, 27,
47, 40, 66, 90, 99, 93, 63, 90];
var filterData = mathData.where((e) => e < 10).toList();
return MaterialApp(
home: Scaffold(
body: SafeArea(
child: GridView.builder(
gridDelegate: SliverGridDelegateWithFixedCrossAxisCount(
crossAxisCount: 4, mainAxisSpacing: 8, crossAxisSpacing: 8),
itemCount: filterData.length,
itemBuilder: ((context, index) {
return Padding(
padding: const EdgeInsets.all(3),
child: Container(
decoration: BoxDecoration(
color: Colors.white,
boxShadow: [
BoxShadow(
color: Colors.grey.withOpacity(0.5),
spreadRadius: 1,
blurRadius: 1),
],
borderRadius: BorderRadius.circular(16)),
child: Center(
child: Text(filterData[index].toString()),
),
),
);
}),
),
),
),
);
}
}
필터링한 데이터를 변수로 만들어서 사용했다
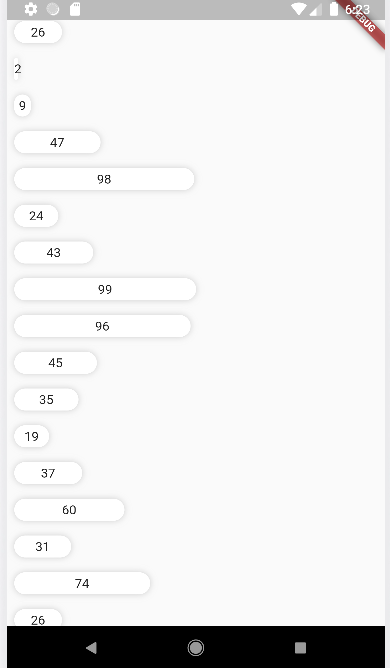
4-3) 스크롤이 가능한 형태이며 모든 수를 대상으로 width : [수*2], height: 24 만큼의 크기를 가진 Container를 100개를 나열하는 코드를 작성하시오.
import 'package:flutter/material.dart';
void main() {
runApp(const MyApp());
}
class MyApp extends StatelessWidget {
const MyApp({super.key});
@override
Widget build(BuildContext context) {
var mathData = [26, 2, 9, 47, 98, 24, 43, 99, 96, 45, 35,
19, 37, 60, 31, 74, 26, 4, 28, 19, 59, 14, 75, 13,
93, 88, 64, 15, 68, 34, 96, 48, 1, 44, 14, 11, 31,
39, 28, 100, 22, 73, 78, 98, 36, 49, 74, 16, 35, 91,
14, 73, 93, 49, 3, 99, 4, 29, 86, 56, 17, 13, 97, 55,
94, 7, 100, 66, 59, 85, 94, 11, 16, 48, 16, 44, 75, 14,
17, 88, 92, 12, 49, 35, 42, 82, 19, 27, 11, 21, 34, 27,
47, 40, 66, 90, 99, 93, 63, 90];
19, 37, 60, 31, 74, 26, 4, 28, 19, 59, 14, 75, 13,
93, 88, 64, 15, 68, 34, 96, 48, 1, 44, 14, 11, 31,
39, 28, 100, 22, 73, 78, 98, 36, 49, 74, 16, 35, 91,
14, 73, 93, 49, 3, 99, 4, 29, 86, 56, 17, 13, 97, 55,
94, 7, 100, 66, 59, 85, 94, 11, 16, 48, 16, 44, 75, 14,
17, 88, 92, 12, 49, 35, 42, 82, 19, 27, 11, 21, 34, 27,
47, 40, 66, 90, 99, 93, 63, 90];
return MaterialApp(
home: Scaffold(
body: SafeArea(
child: ListView.builder(
itemCount: mathData.length,
itemBuilder: ((context, index) {
return Align(
alignment: Alignment.centerLeft,
child: Padding(
padding: const EdgeInsets.all(8.0),
child: Container(
width: mathData[index] * 2,
height: 24,
decoration: BoxDecoration(
borderRadius: BorderRadius.circular(16),
color: Colors.white,
boxShadow: [
BoxShadow(
color: Colors.grey.withOpacity(0.5),
spreadRadius: 0,
blurRadius: 5.0,
)
]),
child: Center(
child: Text(mathData[index].toString()),
),
),
),
);
}),
),
),
),
);
}
}
[참고]
[Flutter] Container 둥글기 주기,그림자 효과 border,shadow
안녕하세요. 욱쓰입니다. 밋밋한 Container에 둥글기와 그림자 효과를 적용해보고 알아보는 포스팅을 작성하겠습니다. 전체 둥글기 Container( width: 200, height: 200, decoration: BoxDecoration( color: Colors.teal, b
black-glasses.tistory.com