-
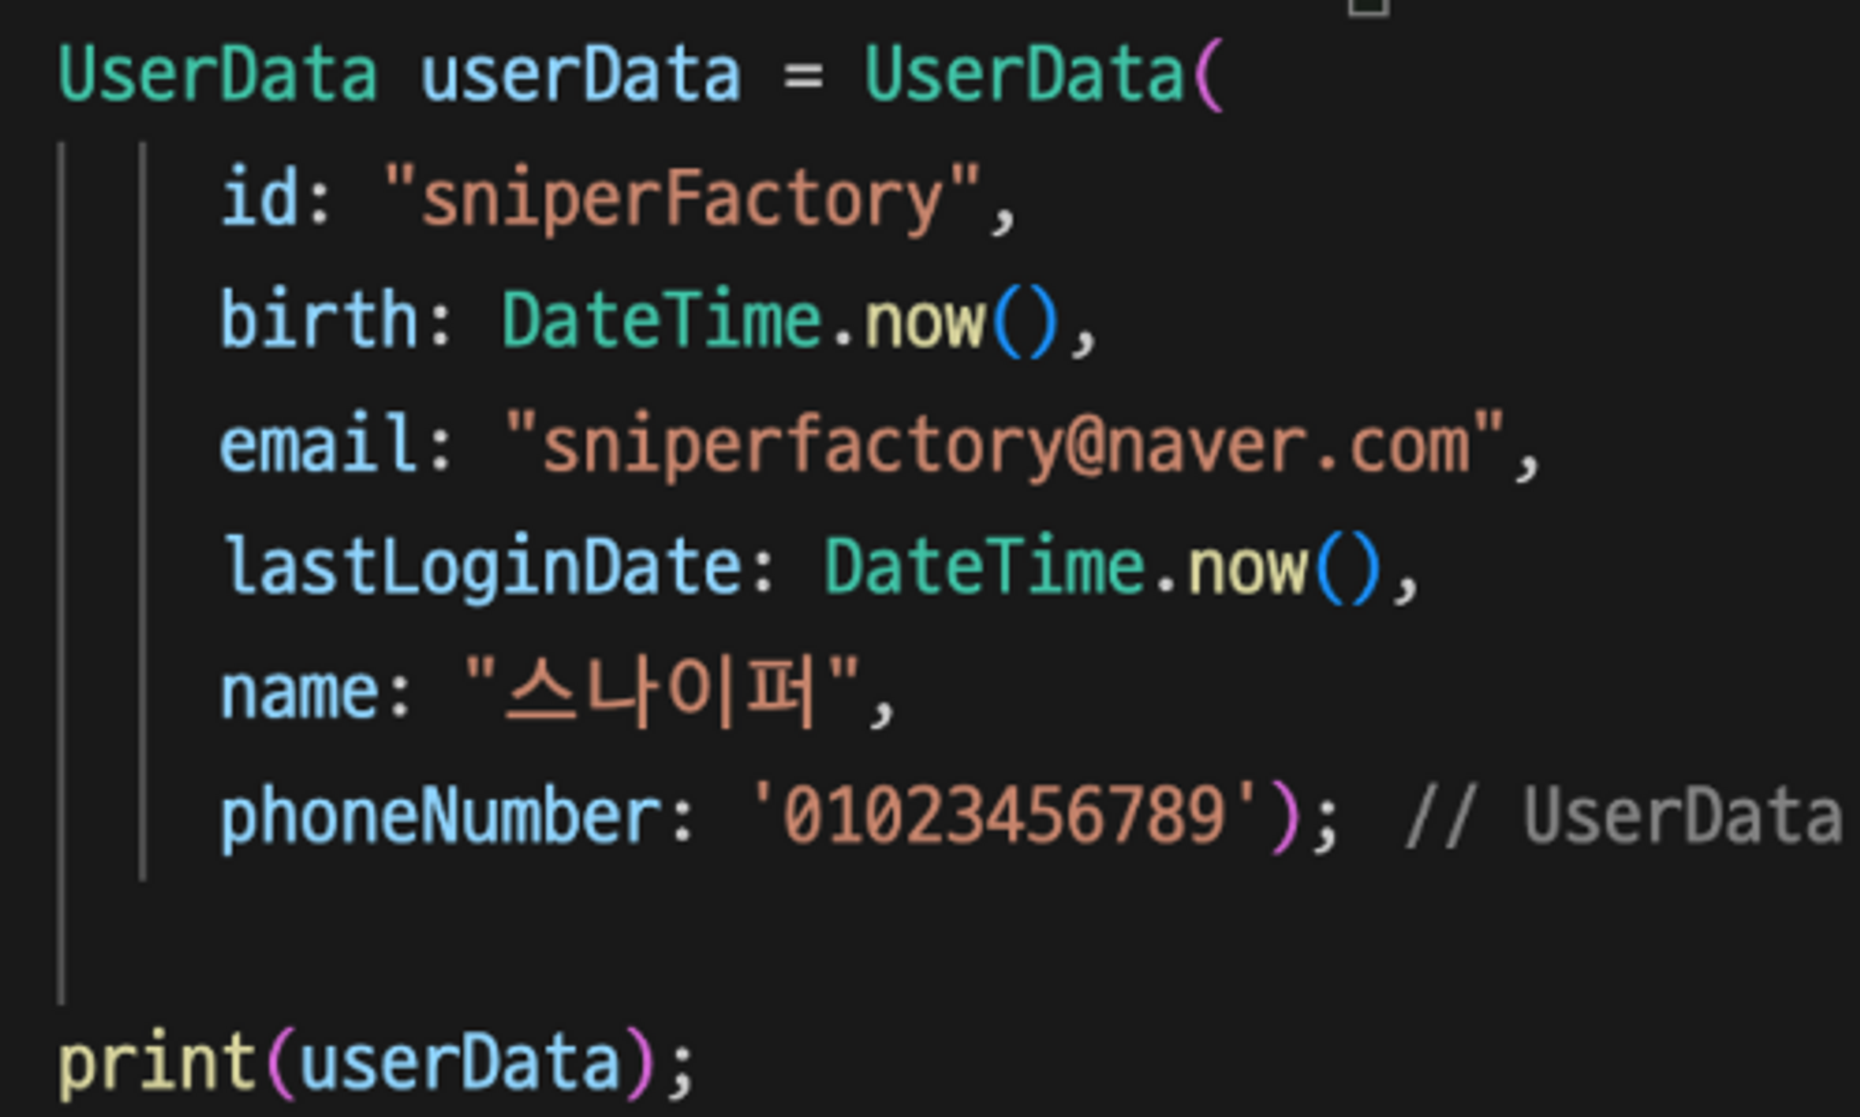
다음 코드를 실행시 얻을 수 있는 결과를 참고하여 UserData 클래스를 제작하고 toString를 새로 재정의하여 만드시오.
- main함수내용
- 실행결과

class UserData {
  String id;
  DateTime birth;
  String email;
  DateTime lastLoginDate;
  String name;
  String phoneNumber;

  @override
  String toString() {
    return "id : $id \nname: $name \nbirth : $birth \nphoneNumber : $phoneNumber \nemail : $email \nlastLoginDate : $lastLoginDate";
  }

  UserData({
    required this.id,
    required this.birth,
    required this.email,
    required this.lastLoginDate,
    required this.name,
    required this.phoneNumber,
  });
}

void main(List<String> arguments) {
  UserData userData = UserData(
      id: "id",
      birth: DateTime.now(),
      email: "sniperfactory@naver.com",
      lastLoginDate: DateTime.now(),
      name: "스나이퍼",
      phoneNumber: '01023456789');
  print(userData);
}
1번 결과 2. 다음의 URL에 네트워크 요청을 보내고, 얻은 데이터를 Class를 통해 생성할 수 있도록 만드시오
- https://sniperfactory.com/sfac/http_json_data
- 이 때 제작하는 Class 명은 자유입니다.
- 받아온 네트워크 데이터를 Class에 적용시키고 플러터를 사용하여 다음의 화면을 제작합니다

예제 우선 lib안에 model 폴더를 만들고 post.dart를 만듦
class Post {
  String name;
  String description;
  String image;
  int price;

  Post(
      {required this.name,
      required this.description,
      required this.image,
      required this.price});

  //이름있는생성자 Map으로 바꿔줘서 JSON처럼 서버에 보내줘야함
  Post.fromMap(Map<String, dynamic> map)
      : name = map["name"],
        description = map['description'],
        image = map['image'],
        price = map['price'];
}
fromMap은 map 데이터 구조를 초기화하는 생성자 메서드이다. 주로 모델 클래스에서 데이터베이스에서 받아온 데이터를 미리 지정한 변수 구조에 초기 설정하는데 사용된다.
데이터베이스에서 데이터를 모델 구조에 맞게 초기화시키는 과정이다.
main.dart
import 'package:assigment23/model/post.dart';
import 'package:flutter/material.dart';
import 'package:dio/dio.dart';

void main() {
  runApp(const MyApp());
}

class MyApp extends StatelessWidget {
  const MyApp({super.key});

  @override
  Widget build(BuildContext context) {
    return MaterialApp(
      home: MainPage(),
    );
  }
}

class MainPage extends StatefulWidget {
  const MainPage({super.key});

  @override
  State<MainPage> createState() => _MainPageState();
}

class _MainPageState extends State<MainPage> {
  Future<Post> getData() async {
    var dio = Dio();
    var url = "https://sniperfactory.com/sfac/http_json_data";
    var res = await dio.get(url);
    return Post.fromMap(res.data['item']);
  }

  @override
  Widget build(BuildContext context) {
    return Scaffold(
        body: FutureBuilder(
            future: getData(),
            builder: (context, snapshot) {
              if (snapshot.hasData) {
                return Center(
                  child: Card(
                    clipBehavior: Clip.antiAliasWithSaveLayer,
                    margin: const EdgeInsets.symmetric(
                        vertical: 230, horizontal: 105),
                    shape: RoundedRectangleBorder(
                      borderRadius: BorderRadius.circular(16),
                    ),
                    child: Column(
                      crossAxisAlignment: CrossAxisAlignment.start,
                      children: [
                        Image(
                          image: NetworkImage(snapshot.data!.image),
                          fit: BoxFit.cover,
                        ),
                        Padding(
                          padding: const EdgeInsets.all(8.0),
                          child: Text(
                            snapshot.data!.name,
                            style: const TextStyle(fontWeight: FontWeight.bold),
                          ),
                        ),
                        const Divider(
                            thickness: 1, height: 1, color: Colors.grey),
                        Padding(
                          padding: const EdgeInsets.all(8.0),
                          child: Text(snapshot.data!.description),
                        ),
                        Padding(
                          padding: const EdgeInsets.fromLTRB(9, 5, 0, 0),
                          child: ElevatedButton(
                              onPressed: () {},
                              child: Text('${snapshot.data!.price}원 결제하고 등록')),
                        )
                      ],
                    ),
                  ),
                );
              }
              return const CircularProgressIndicator();
            }));
  }
}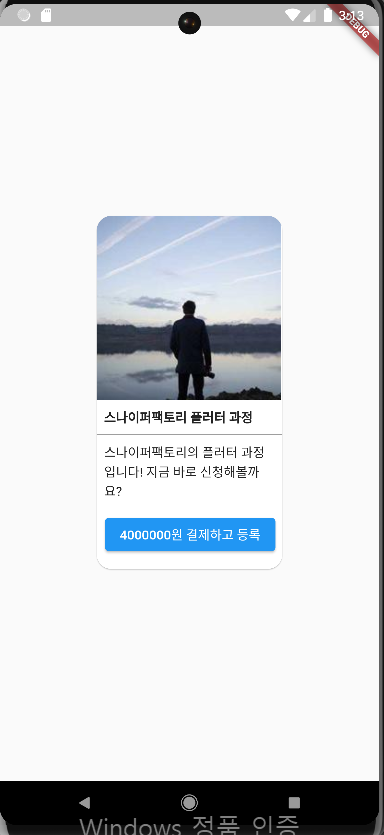
결과 3. 아래 main함수가 실행될 수 있도록 Dart 프로젝트를 구성하고, 지하철과 사람을 표현하는 클래스를 직접 구성하시오.
class Subway { //... } class Human { //... } void main() { // 인스턴스 생성 var subway = Subway(line:'2호선', current: '홍대입구역', passengers:[]); var human1 = Human(name: '사람1', money: 5000, curSubway: null); var human2 = Human(name: '사람2', money: 3450, curSubway: null); var human3 = Human(name: '사람3', money: 450, curSubway: null); // 사람 탑승 print(human1.getOn(subway)); print(human2.getOn(subway)); print(human3.getOn(subway)); // 현재 지하철 탑승 print(subway.toString()); // 각 사람들의 현재 상태를 출력 print(human1.toString()); print(human2.toString()); print(human3.toString()); }- 반드시 각 클래스는 생성자를 포함하도록 하세요.
- 이 때, Subway 클래스는 생성시에 생성되었다는 안내문구가 출력됩니다.
- 메인함수(void main)는 일체 수정할 필요가 없습니다.
- 각 클래스는 toString의 메서드를 이용하여 아래의 실행결과와 일치하게 나올 수 있도록 합니다.
- 그 외 멤버변수, 멤버함수는 자유입니다.
- 실행결과(출력결과)는 다음과 같습니다.
[2호선] 지하철이 생성되었습니다.
사람1이(가) 성공적으로 탑승하였습니다. (남은 돈 : 3500)
사람2이(가) 성공적으로 탑승하였습니다. (남은 돈 : 1950)
사람3이(가) 탑승에 실패하였습니다 (잔액부족)
Subway([2호선 | 홍대입구] 현재 지하철 탑승인원 2명)
Human(human:사람1, money: 3500, curSubway: Subway([2호선 | 홍대입구] 현재 지하철 탑승인원 2명))
Human(human:사람2, money: 1950, curSubway: Subway([2호선 | 홍대입구] 현재 지하철 탑승인원 2명))
Human(human:사람3, money: 450, curSubway: null)
-------
class Subway {
  String line;
  String current;
  List<Human> passengers;

  Subway(
      {required this.line, required this.current, required this.passengers}) {
    print('[$line] 지하철이 생성되었습니다.');
  }

  @override
  String toString() {
    return 'Subway([$line | $current] 현재 지하철 탑승 인원 ${passengers.length}명)';
  }

  passengersAdd(Human name) {
    passengers.add(name);
  }
}

class Human {
  String name;
  int money;
  Subway? curSubway; //null이 나올수 있음

  Human({required this.name, required this.money, this.curSubway});


  @override                //안해주면 Instance of'Human'
  String toString() {
    return "Human(human:$name, money:$money, curSubway: $curSubway)";
  }

  getOn(Subway subway) {
    if (money > 1500) {
      money -= 1500;
      subway.passengersAdd(Human(name: name, money: money));  //승객추가
      curSubway = subway;     //갱신?
      return "$name이 (가) 성공적으로 탑승하였습니다. (남은 돈 : $money)";
    }
    return "$name이 (가) 탑승에 실패하였습니다 (잔액부족)";
  }
}

void main() {
  // 인스턴스 생성
  var subway = Subway(line: '2호선', current: '홍대입구역', passengers: []);
  var human1 = Human(name: '사람1', money: 5000, curSubway: null);
  var human2 = Human(name: '사람2', money: 3450, curSubway: null);
  var human3 = Human(name: '사람3', money: 450, curSubway: null);

  // 사람 탑승
  print(human1.getOn(subway));
  print(human2.getOn(subway));
  print(human3.getOn(subway));

  // 현재 지하철 탑승
  print(subway.toString());

  // 각 사람들의 현재 상태를 출력
  print(human1.toString());
  print(human2.toString());
  print(human3.toString());
}
결과...